Showing posts with label tutorial. Show all posts

Jan 26, 2012

Stabilo boss highlighting marker costume-DIY Tutorial

Starting to write again after so long….

I was asked a question today, following a clip I uploaded to YouTube a few years ago;

How we made the Stabilo boss costumes for our girls.

The most difficult thing about costume is what to make because the idea is the hardest part .

We were lucky the girls came up with the idea and we were

"only left with the making of..."

Another thing to remember is... the effect of a costume is much stronger when it come in multiples of the same kind!!!!

After this information the last tip is......

Get a friend to work with or even two.....everything looks & becomes easier that way!!!!!

Well…

The best way to explain is with photos....


Stabilo boss highlighting marker costume= front
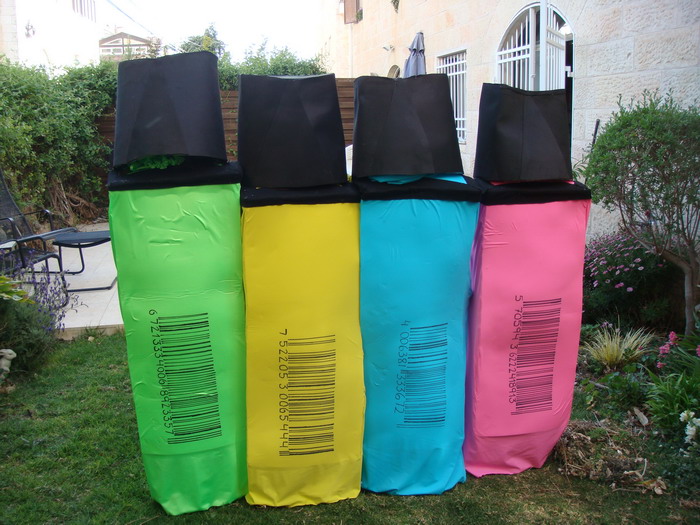


Stabilo boss highlighting marker costume=back
with bar code


Stabilo boss highlighting marker costume=back
with bar code- cap off

For the hats- marker cover

*Sol foamed plastic surfaces of 2 mm thickness. Easy to cut, mufti-purpose, can be pasted on it and decorate with ease .

*cardboard to keep the shape

*everything glued with hot glue gun

*for the comfortably of the shoulders the inner part is lined with foam.


The body- Marker

Stretch fabric in various colors according to marker (each girl told us what color she wants)

Measure according to size of child or adult (I don't have the exact measurements) we made the size of our children they were 12 years old, but was also used adults ,since the fabric was stretch and elastic

We attached the foam to the cloth with glue

Foam mattress

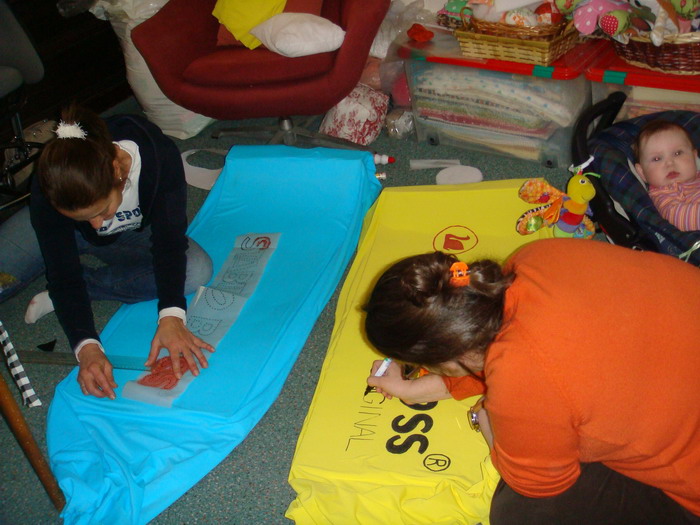
Enlarge the pattern on to paper and make holes along the pattern

Mark on fabric according the holes

Fill in the color


costumes ready to ware

it even fits me..... I'm inside!


Don"t forget use your imagination .... everything is possible to make :-))

Have a Happy Purim .... Halloween


Mar 9, 2009

Google analytics on blog or Etsy shop

Want to know who sees your blog, where they come from, how they got there,
which post was best reacted to, what words connect to the blog, shop etc.

The solution…. GOOGLE ANALYTICS!!! For FREE!!!

All you have to do is sign in to Google analytics through your Google account.


Google explains everything to you… with just a few steps…
Google analytics help center

I'll explain with a few of my simple words;

If I could understand,and it's not my profession… then every one can ! :-)


1. Sign in to Google analytics.
2. Add website profile---- add profile to new domain- your URL
3. get your tracking ID from Google analytics
3. add your ID to your blog ,go to blogger layout,
"add a gadget"and there add the HTML google analytics gives you. These actions will allows Google to track your site.


It takes 24 hours for Google analytics to start - so be patient !

There will be no history from before you added your ID,
Even if you are not exactly sure what to do, try it out, so that you don't lose time.

It is a lot of fun to check and find out what people are looking up in your blog, how long they stay in each post , how they linked to your site etc..

Etsy sellers who want to add their shop to Google analytics…

Add your URL to Google analytics.
All you have to do is add your Google analytics tracking ID in "Your Etsy"
in the shop setup section–Web Analytics. There you will find a place to add your ID.


As I said before, it takes time until you start getting reports from analytics,
at least 24 hours.
…patience… you waited until now , you can wait a little longer!


Feb 23, 2009

How to sew Oilcloth / vinyl fabric tutorial

You want to sew oilcloth / vinyl fabric?
You don't know how…

We found a few solutions over the course of our work which we would love to share with you.

* Do not sew and unstitch it will leave marks that you will not be able to repair

* You must have a good design, try out first on paper or old linen fabric.

* Do not use pins – they will make holes.


* Make all your signs / marks with sewing chalk


* Use masking tape to connect webbing


* Use paper clips or cloth peg to hold together the different parts


*** Most important use a special Teflon leg for the sewing machine so that the oil cloth will not get stuck.
You can find a great tutorial on U handbag .


Feb 14, 2009

Alfa studio- Guest Artist in Australian Homespun Magazine


Sebastian the snail sitting on the top shelf on the front page!!!


We are so privileged to be Guest Artist on the front page and cover story on Australian Homespun craft magazine this month issue February 2009.

The editor of homespun magazine saw our work on our etsy shop and offered us an opportunity to showcase our designs. We were especially honored as we are the first Israeli guest artisans on the magazine.


Our work is presented with full description of ourselves, our background, how we started, the business and a tutorial of how to put together our "Sebastian the snail".


How to create a snail – a full tutorial teaching even a beginner crafter "how to", step by step put together a snail in a days work.


Our motto: "Always to things from your heart it will show through your work".